Dawson Forge
Dawson Forge
  • Home
  • Blacksmith
    • Ironwork
    • Historical Recreation
  • Bladesmith
    • Bladesmithing
    • Eagle Scout Knife
    • Heirloom Knife
    • Knife Care & Sharpening
    • Bladesmithing Process
  • Sheaths
  • About Us
    • About Dawson Forge
    • Classes & Demos
    • The Artisan
    • Contact Dawson Forge
    • Commissions
  • More
    • Home
    • Blacksmith
      • Ironwork
      • Historical Recreation
    • Bladesmith
      • Bladesmithing
      • Eagle Scout Knife
      • Heirloom Knife
      • Knife Care & Sharpening
      • Bladesmithing Process
    • Sheaths
    • About Us
      • About Dawson Forge
      • Classes & Demos
      • The Artisan
      • Contact Dawson Forge
      • Commissions
  • Sign In
  • Create Account

  • My Account
  • Signed in as:

  • filler@godaddy.com


  • My Account
  • Sign out

Signed in as:

filler@godaddy.com

  • Home
  • Blacksmith
    • Ironwork
    • Historical Recreation
  • Bladesmith
    • Bladesmithing
    • Eagle Scout Knife
    • Heirloom Knife
    • Knife Care & Sharpening
    • Bladesmithing Process
  • Sheaths
  • About Us
    • About Dawson Forge
    • Classes & Demos
    • The Artisan
    • Contact Dawson Forge
    • Commissions

Account

  • My Account
  • Sign out

  • Sign In
  • My Account

The Bladesmithing Process

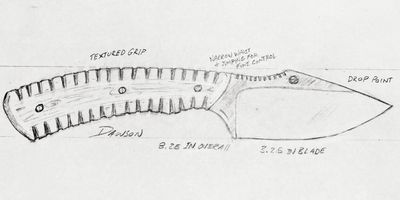
My process starts with a demential drawing that I share with the client.

For this knife I've selected the steel 80CRV2 for its durability and edge retention qualities. 

Cut the steel to size.  I cut-off square because I always forge the point. You'll learn why if you take my class.

Into the forge she goes.

I forge the point first.

Then I isolate the transition between handle and blade.

Next I draw-out and shape the handle.  She's beginning to look like a knife.

This knife will have a thumb notch - Notice the bump on the spine. I forge that in next before forging the choil and shaping the blade.  

I draw out the choil and start working down the blade. 

As I widen the blade and thin the edge, the point rises forming a rough forged shape closer to the original drawing.  I do some finishing work at the forge & anvil to get it even closer, remove any deep hammer marks, and ensure it's perfectly flat and straight.

When the forging is done, it goes to the grinder to profile. Now she's as pretty as a picture. 

Then back to the forge to normalize for 3 cycles and finally quench to harden the blade. She'll spend about 2 hrs in my oven to temper to a final RHC of 60-61.

The hardened blade is cleaned up & sharpened on the grinder, then tested. This white tail field dresser gets a flat grind with an appleseed edge.

Red Oak for handle scales on this knife.

Cut and fit handle scales with epoxy & stainless steel pins.

Tape the blade before shaping the handle because I like my fingers. 

The handle is shaped on the belt sander then hand sanded.

Field dressing can be messy work. This handle features a narrow waist, finger well and textured grip.

A torch brings out the grain of the wood adding hardness and a little extra protection. She's then finished in Danish oil. Finally the blade is polished to razor sharpness. Dave's Field Knife is ready for a custom leather sheath.

Contact Us

What type of knife can I forge for you!

This site is protected by reCAPTCHA and the Google Privacy Policy and Terms of Service apply.

Visitation by Appointment Only

Our hours of operation are generally Mon - Sat, 9-5 We love our customers, but this is a small home-business. Please respect our privacy.

609-865-0418

Copyright © 2025 Dawson Forge - All Rights Reserved.

  • Home
  • Ironwork
  • Historical Recreation
  • Bladesmithing
  • Eagle Scout Knife
  • Knife Care & Sharpening
  • Bladesmithing Process
  • About Dawson Forge
  • Classes & Demos
  • Commissions